Posts

Showing posts from 2016

Christmas decorations using Stampin' Up! punches

Image
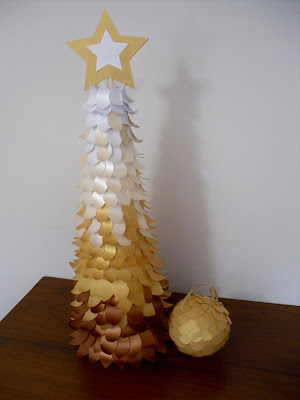
Just a quick share of a couple of ornaments I made using SU punches.  The polystyrene tree and ball were bought from Riots Art and Craft, and to re-create the decorations I saw on Youtube, via Lia Griffith I used the two shapes in the bow punch for the 'leaves' of the tree, punching them out of metallic paper in bronze, gold, ivory and white.  The ball used the 3/4" punch and only gold.  The shapes are attached using hot glue.  Just another use for Stampin' Up! punches!!

Giving Thanks

Image
I have just noticed a post from Less is More about a special challenge over at the Stamplorations blog, on the theme of Giving Thanks, and as a friend asked me yesterday to make a Thank You card for the musical director of her local choir, I had just the card to enter! Wendy's favourite colour is blue, so my watercolored background card is in soft blue, turquoise and pale green. Card recipe: Stamps - Stampin' Up!, including the letters for her name - from Brushwork Alphabet Die - Party Music by Memory Box Enamel dots by Ranger Distress Inks - Salty Ocean, Broken China, Peacock Feathers, Cracked Pistachio

Scrapbook Boutique November Blog Hop and Challenge

Image
Welcome once again to  Scrapbook Boutique's  monthly challenge and blog hop.  You should have arrived here from  Angela's  amazing blog but if you didn't and want to start at the beginning, just click on the SBB blog link above and start again!  Today's challenge will be the last for this year, and fittingly, the inspiration board is very, very Christmasy! Christmas is such a fun time of the year for most of us, especially the dressing of the tree, with brilliant baubles, tinsel and decorations in abundance.  So for my card I have chosen to make a bauble 'shaker' - this time the shaker is on top of the card, not concealed between the card and the card front, and if it was not adhered to the card, could actually be hung on the tree, as it is a separate element. I have used the Kaisercraft stamp and die set called 'Merry Christmas' - stamping the tree and deer, spongeing the background and adding glitter, before the sequins and beads were e

Vellum or Acetate

Image
Recipe this week at Less is More is to use vellum or acetate.  Stunning creations by the DTs to inspire, but I chose the vellum this time.  I wish I'd had more time to create, as then I would have attempted a beautiful technique used by Therese Calvird on the corner of a card which was published in Cardmaking, Stamping and Papercraft Issue 23 Vol 2 pg 26, where she created a bouquet of flowers, some of which were inside the card, but seen through the acetate corner.  Difficult to describe but really beautiful! Alas, I'm not Therese, so here are my cards, created for this challenge.  This card used a stamp by Power Poppy - such beautiful illustrations by Marcella! -  white heat embossed on vellum and coloured with Copics on the back side.  Fussy cut out and placed over Fresh Foliage die by Memory Box, also cut in vellum.  The specks are from Stampin' Up! Grunge set. I'm making lots of Christmas cards at the moment, keeping them very simple as I need about

CASeing Stampin' Up!

Image
A quick post of two cards I made, totally caseing a card I saw online by Brenda Keenan, but I can't find it again on her blog.  If I do, I'll post it later. PS.  I have just found a similar card on Pinterest and the link is here :   It is created by cutting a 'mask' from scrap paper, using the large leaflet framelet.  Inside the mask, you stamp a tree from Sheltering Tree.  And then have fun spongeing the colours inside the leaf!  This is similar to the card I saw online, which may have come from the SU itself.  You end up with a one-layer card, with lots of depth - of course I added layers beneath to show off the beautiful colours:) Now the next one, is my own invention, copying the same process.  I've used a large butterfly die to create the mask, and inside I stamped a Medallion by Stampin' Up!  I used aqua, purple and pinks for the butterfly colours to make a different look.

Spiders and Insects!!

Image
Great challenge theme this week at Less is More - it is Spiders or Insects! I thought I'd use my mason jar stamp by Dear Lizzy and a ladybug from Paper Smooches 'Little Lady' to create a handy card for friends who have succumbed to one of the many viruses plaguing us at present.  It's hard to find someone who hasn't been affected this past winter, even though we all diligently take our vaccine for the flu.  Spring has just sprung here and we are so looking forward to warmer weather:) I stamped the lid again on a spare piece of card, and popped it up on foam dots - it just added a bit of form to this very simple card.  The sentiment was computer generated, in Two Peas Hearts Delight font.  A strip of paper by Heidi Swapp and glossy accents on the bug to finish.

Scrapbook Boutique October blog hop and challenge

Image
Wow!  Where has the year gone already?  We will soon be caught up with the 'busyness' of Christmas, summer and holidays no doubt, so I'm happy to welcome you to this month's Blog Hop and Challenge at Scrapbook Boutique - let's have fun while we can! You should have arrived here from  Angela's  amazing blog but if you didn't and want to start at the beginning, just click on the SBB blog link above and start again!   Here is this month's gorgeous mood board, to inspire you!  It may be the butterflies, the colours, the designs - whatever takes your fancy!  I love using butterflies in my cards, so I was very happy with this challenge!  I was inspired by the idea of drifts of butterflies and those lovely pink colours! To create my stencil for the background butterflies, I punched from acetate a small butterfly using a Martha Stewart punch, and sponged the negative space with Distress Inks - either Spun Sugar or Worn Lipstick, moving the s

Dream

Image
Dream is the theme for this week at Less is More - and it's a one-layer card!  I loved the sound of this challenge, so I'll get straight to it! This ethereal image (a freebie set by Indigo Blu in the magazine Australian Simply Cards) has been stamped in ombre ink, and clear embossed.  When thoroughly dry and cool - and rubbed with an anti-static bag, I scribbled various parts of the image with a Quickie glue pen, and sprinkled glitter on, and left it to dry.  The sentiment by Inspired by Stamping, has been inked with Dapper Denim by Stampin' Up!  A couple of score lines to ground my image and some coordinating sequins and my one-layer card is complete. I have tried again to capture the sparkle, but not too successfully I'm afraid.  However, even without the sparkle, I feel it is pretty enough:)

WCMD - and the card I made on that day

Image
Yesterday I was engrossed with all the cards I saw on fb and elsewhere marking this special day in the cardmakers' calendar, and one technique that really caught my eye was the Pop and Pivet card.  I saw several of these cards, some using Stampin' Up! products that looked great, and one video I watched used Kaisercraft products.   This video shows the method I used to make my pop and pivot card, shown by Collette Mitrega on youtube.  She is an excellent tutor, because here is my card:  I used paper by Kaisercraft for all the sections - from the 6.5" x 6.5" paper pad, Holly Jolly. As the front of the card is lifted, the folded inside pages begin to unfold. This is the inside fully extended.  I do have to wonder though, how do you display this card - I guess you have to keep it closed and then when it's opened - Surprise! It was fun to make, and if you are interested, do check out Colette's video tutorial!

WCMD - and Less is More

Image
World Card Making Day has had loads of publicity on the internet this weekend, and although it was technically yesterday, I'm finally getting organised enough to post a card or two for this special occasion.  The challenge at Less is More today is a colour one - turquoise and lilac!  A beautiful combination, shown off superbly by the design team members.  So the first is the one that I'll be entering in this challenge, but the second is a bonus!  I loved the colour combination so much that I decided to make two cards - both images are from the same set, which includes the gorgeous sentiment stamps. The stamp set was a freebie included in a recent publication:  Cardmaking in Easy Steps, Issue 17.  It is an Australian magazine, and I love that their photopolymer stamps are of a very good quality - I think you can see that with the crisp sentiments. card recipe:  white heat emboss the image, mask the circle and use the following Distress Inks to sponge - Mil

Dream Catcher

Image
Something different today - my first crochet project for many years.  I decided to make a dream catcher, after seeing them hanging in a shop recently.  This one is for Lucy, as she likes the colour aqua - thanks to my daughter-in-law for the site for the pattern.  The pattern was actually to fill a hoola hoop, using a very large hook, but that wasn't quite the look I was aiming for.  I used blended cotton yarn from Lincraft, and a smallish hook.  I covered an embroidery hoop with strips of fabric, and used various lace, beads, braid and ribbon to hang from it.  I photographed this at night and with pale walls I had to find something dark to place it in front of - they just happened to be circles too! Save Save

A birthday card for Lucy

Image
Those 'little' granddaughters of ours are not so little anymore - Lucy turns 10 this month, and leaves us wondering where all that time has gone.  Lucy and her sister have been going to swimming training for many years, as most do at this age, and they are both very good swimmers.  This year has been particularly successful for Lucy, so I thought a 'watery' themed card might be a good choice. Image has been gold embossed, and popped up onto the sponged background.  Shimmery water was flicked onto sponging, for water bubbles, a Tim Holtz die cut, coloured and adhered to top corner, and some underwater images stamped over the bottom. I had already added some glitter to hair and scales but thought a little gold shimmer might be worth adding, and so that went onto the tail, and the ends of the hair. This pic shows that shimmer - also added lightly to the sea weed.  A beautiful image for a beautiful girl - Happy Birthday Lucy!

My Favourite Flower (or one of them)

Image
New challenge at Less is More - this week it is a one-layer card, featuring your favourite flower.  I have chosen the rose - which is probably my favourite flower, but I love most flowers - I even love lilies, but they give me hay fever, so I can't enjoy them inside! This is a smaller card (Stampin' Up! notecard) - just 3.5 x 5" and is the perfect size for those little notes that you need to send just to say hello! Card recipe: Stamps:  Altenew Rose - a freebie a while ago in the magazine 'Australian Simply Cards, Issue 92) , and the sentiment is by Clearly Besotted: 'Scribbled Flowers'. Inks:  by Stampin' Up! - Blushing Bride, Flirty Flamingo, Strawberry Slush. Thanks so much for coming by!